21st Century Learning and Teaching
586.7K views | +3 today
21st Century Learning and Teaching
Related articles to 21st Century Learning and Teaching as also tools...
Curated by Gust MEES
Your new post is loading...

Popular Tags

Current selected tags: '2018', 'Music'. Clear
Scooped by Gust MEES
Scoop.it!

Convert Sound Files in Audacity | Microcontroller Compatible Audio File Conversion | Adafruit Learning System | #Coding #Maker #MakerED #MakerSpaces

Convert Sound Files in Audacity by Mike Barela
Small microcontroller audio projects are designed to play very specific types of audio files. If your music sample is in MP3 format, or 44KHz .wav or if you have grabbed a sample from a source (or the Internet) and do not know how it was encoded, you'll want to convert it to the right format.

This way you will get the best sounding audio, and it'll make using audio with your code painless!

This page will show how to convert your sound file(s) into PCM 16-bit Mono WAV files at 22KHz sample rate, which is usually best for the current crop of microcontrollers which take WAV files and play them on a speaker.

Currently, we are recommending two ways to convert the files: via use of the program Audacity or via iTunes. Other software may do similar conversions, just remember the parameters above when you do the conversion.


Learn more / En savoir plus / Mehr erfahren:


https://www.scoop.it/t/21st-century-learning-and-teaching/?&tag=ARDUINO


https://www.scoop.it/t/21st-century-learning-and-teaching/?&tag=Coding


Gust MEES's insight:

Convert Sound Files in Audacity by Mike Barela
Small microcontroller audio projects are designed to play very specific types of audio files. If your music sample is in MP3 format, or 44KHz .wav or if you have grabbed a sample from a source (or the Internet) and do not know how it was encoded, you'll want to convert it to the right format.

This way you will get the best sounding audio, and it'll make using audio with your code painless!

This page will show how to convert your sound file(s) into PCM 16-bit Mono WAV files at 22KHz sample rate, which is usually best for the current crop of microcontrollers which take WAV files and play them on a speaker.

Currently, we are recommending two ways to convert the files: via use of the program Audacity or via iTunes. Other software may do similar conversions, just remember the parameters above when you do the conversion.


Learn more / En savoir plus / Mehr erfahren:


https://www.scoop.it/t/21st-century-learning-and-teaching/?&tag=ARDUINO


https://www.scoop.it/t/21st-century-learning-and-teaching/?&tag=Coding


No comment yet.
Scooped by Gust MEES
Scoop.it!

MP3 player using Arduino and DFPlayer mini | #Coding #Maker #MakerED #MakerSpaces

MP3 player using Arduino and DFPlayer mini | #Coding #Maker #MakerED #MakerSpaces | 21st Century Learning and Teaching | Scoop.it

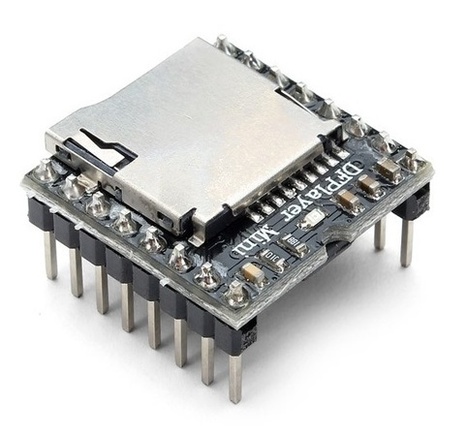
Today, we will build an mp3 player using an Arduino and the DFPlayer mini MP3 module.

The DFplayer mini is a small, low-cost mp3 module with a simplified audio output that can be connected directly to a speaker or an earphone jack. The module can be used as a stand-alone module with attached battery, speaker, and push buttons or used in combination with a microcontroller or development board like the Arduino, enabled for RX/TX (Serial) communication, thus through simple serial commands we can play music and perform other functions like playing the next and previous song, shuffle, pause the song currently being played etc.


The module comes with an SDcard slot and supports both FAT16, FAT32 file system.


Learn more / En savoir plus / Mehr erfahren:


https://www.scoop.it/t/21st-century-learning-and-teaching/?&tag=ARDUINO


https://www.scoop.it/t/21st-century-learning-and-teaching/?&tag=Music


Gust MEES's insight:

Today, we will build an mp3 player using an Arduino and the DFPlayer mini MP3 module.

The DFplayer mini is a small, low-cost mp3 module with a simplified audio output that can be connected directly to a speaker or an earphone jack. The module can be used as a stand-alone module with attached battery, speaker, and push buttons or used in combination with a microcontroller or development board like the Arduino, enabled for RX/TX (Serial) communication, thus through simple serial commands we can play music and perform other functions like playing the next and previous song, shuffle, pause the song currently being played etc.


The module comes with an SDcard slot and supports both FAT16, FAT32 file system.


Learn more / En savoir plus / Mehr erfahren:


https://www.scoop.it/t/21st-century-learning-and-teaching/?&tag=ARDUINO


https://www.scoop.it/t/21st-century-learning-and-teaching/?&tag=Music


No comment yet.
Scooped by Gust MEES
Scoop.it!

Talking Arduino | Playing a MP3 With Arduino Without Any Module | Playing Mp3 File From Arduino Using PCM | #Coding #maker #MakerED #MakerSpaces #Music

Talking Arduino | Playing a MP3 With Arduino Without Any Module | Playing Mp3 File From Arduino Using PCM | #Coding #maker #MakerED #MakerSpaces #Music | 21st Century Learning and Teaching | Scoop.it

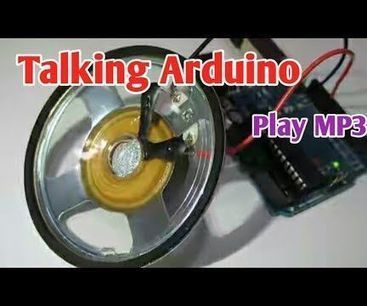
In this instructables we will learn how to play a mp3 file with arduino without using any audio module, here we gonna use PCM library for Arduino which plays...


Learn more / En savoir plus / Mehr erfahren:


https://www.scoop.it/t/21st-century-learning-and-teaching/?&tag=ARDUINO


Gust MEES's insight:

In this instructables we will learn how to play a mp3 file with arduino without using any audio module, here we gonna use PCM library for Arduino which plays...


Learn more / En savoir plus / Mehr erfahren:


https://www.scoop.it/t/21st-century-learning-and-teaching/?&tag=ARDUINO


No comment yet.
Scooped by Gust MEES
Scoop.it!

WTV020-SD sound MODULE with Arduino and example code

WTV020-SD sound MODULE with Arduino and example code | 21st Century Learning and Teaching | Scoop.it

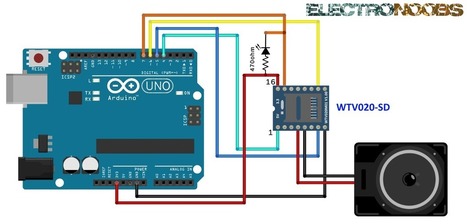
We are going to use a WTV020-SD module to play some ad4 sound files. To control the module we will use an arduino. The steps are: 

- First connect the module to the arduino.
- Prepare the SD card
- Convert wav files to ad4 format and copy example files to the SD
- Inport wtV020 library in Arduino IDE and upload an example code 
- Make a small amplifying circuit


Learn more / En savoir plus / Mehr erfahren:


https://www.scoop.it/t/21st-century-learning-and-teaching/?&tag=ARDUINO


https://www.scoop.it/t/21st-century-learning-and-teaching/?&tag=Music


Gust MEES's insight:

We are going to use a WTV020-SD module to play some ad4 sound files. To control the module we will use an arduino. The steps are: 

- First connect the module to the arduino.
- Prepare the SD card
- Convert wav files to ad4 format and copy example files to the SD
- Inport wtV020 library in Arduino IDE and upload an example code 
- Make a small amplifying circuit


Learn more / En savoir plus / Mehr erfahren:


https://www.scoop.it/t/21st-century-learning-and-teaching/?&tag=ARDUINO


https://www.scoop.it/t/21st-century-learning-and-teaching/?&tag=Music


No comment yet.
Scooped by Gust MEES
Scoop.it!

Simple Arduino Audio/Music Player with SD Card | #Coding #Maker #MakerED #MakerSpaces #LEARNingByDoing

Simple Arduino Audio/Music Player with SD Card | #Coding #Maker #MakerED #MakerSpaces #LEARNingByDoing | 21st Century Learning and Teaching | Scoop.it

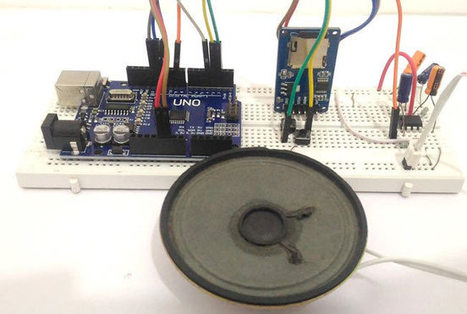
Adding sounds or music to our project will always make it looks cool and sounds much more attractive. Especially if you are using an Arduino and you have lots of pins free, you can easily add sound effects to your project by just investing in an extra SD card module and a normal speaker. In this article I will show you how easy it is to Play music/add sound effects using your Arduino Board.  


Thanks to the Arduino community who have developed some libraries to build this in a fast and easy way. We have also used IC LM386 here for amplification and noise reduction purpose.


[Gust MEES] GREAT music quality!!


Learn more / En savoir plus / Mehr erfahren:


https://www.scoop.it/t/21st-century-learning-and-teaching/?&tag=ARDUINO


https://www.scoop.it/t/21st-century-learning-and-teaching/?&tag=SDCard


Gust MEES's insight:

Adding sounds or music to our project will always make it looks cool and sounds much more attractive. Especially if you are using an Arduino and you have lots of pins free, you can easily add sound effects to your project by just investing in an extra SD card module and a normal speaker. In this article I will show you how easy it is to Play music/add sound effects using your Arduino Board.  


Thanks to the Arduino community who have developed some libraries to build this in a fast and easy way. We have also used IC LM386 here for amplification and noise reduction purpose.


[Gust MEES] GREAT music quality!!


Learn more / En savoir plus / Mehr erfahren:


https://www.scoop.it/t/21st-century-learning-and-teaching/?&tag=ARDUINO


https://www.scoop.it/t/21st-century-learning-and-teaching/?&tag=SDCard


No comment yet.
Scooped by Gust MEES
Scoop.it!

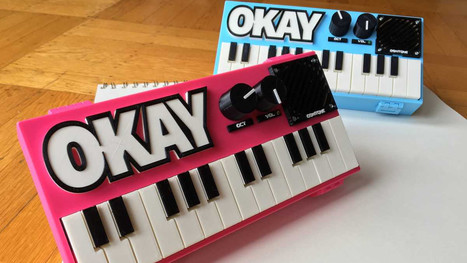
Weekend Project: 3D Printed OKAY 2 Synth Brings Music to the Maker's Ears | #MakerED #MakerSpaces #LEARNingByDoing #3DPrinting #Coding #Electronics

Weekend Project: 3D Printed OKAY 2 Synth Brings Music to the Maker's Ears | #MakerED #MakerSpaces #LEARNingByDoing #3DPrinting #Coding #Electronics | 21st Century Learning and Teaching | Scoop.it

Oskitone’s new and improved OKAY 2 is a mind-blowing DIY synth that you can 3D print and put together on your own. Hone your 3D printing and soldering skills with this sweet musical instrument and let the sounds sweep you away!

Looking for a new musical instrument to play? Why not use your 3D printer to create a synthesizer that is completely tailored to your style? Well, we’ve got a great project for all the musically-minded makers to take on over the weekend.

Last year, the San Francisco-based one-man musical instrument studio Oskitone released its first version of the OKAY synth, and has since refined the concept in a variety of ways. The new and improved OKAY 2 is an analog, monophonic, square wave synthesizer that is largely made up of 3D printed parts. It was designed on OpenSCAD and EAGLE by a man named Tommy, who is in charge of Oskitone.


Learn more / En savoir plus / Mehr erfahren:


https://www.scoop.it/t/21st-century-learning-and-teaching/?&tag=makered


Gust MEES's insight:

Oskitone’s new and improved OKAY 2 is a mind-blowing DIY synth that you can 3D print and put together on your own. Hone your 3D printing and soldering skills with this sweet musical instrument and let the sounds sweep you away!

Looking for a new musical instrument to play? Why not use your 3D printer to create a synthesizer that is completely tailored to your style? Well, we’ve got a great project for all the musically-minded makers to take on over the weekend.

Last year, the San Francisco-based one-man musical instrument studio Oskitone released its first version of the OKAY synth, and has since refined the concept in a variety of ways. The new and improved OKAY 2 is an analog, monophonic, square wave synthesizer that is largely made up of 3D printed parts. It was designed on OpenSCAD and EAGLE by a man named Tommy, who is in charge of Oskitone.


Learn more / En savoir plus / Mehr erfahren:


https://www.scoop.it/t/21st-century-learning-and-teaching/?&tag=makered


No comment yet.