 Your new post is loading...

|
Scooped by
Gust MEES
|
|
|
Scooped by
Gust MEES
|
|
|
Scooped by
Gust MEES
|
|
|
Scooped by
Gust MEES
|
Robot vision made easier
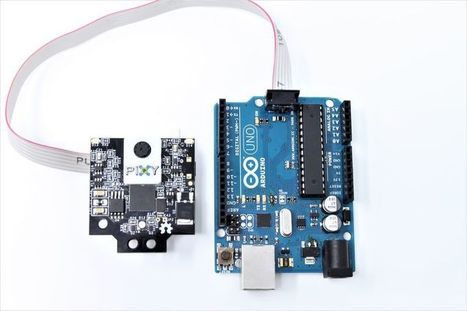
Pixy2 is smaller, faster and more capable than the original Pixy. Like its predecessor, Pixy2 can learn to detect objects that you teach it, just by pressing a button. Additionally, Pixy2 has new algorithms that detect and track lines for use with line-following robots. The new algorithms can detect intersections and “road signs” as well. The road signs can tell your robot what to do, such as turn left, turn right, slow down, etc. And Pixy2 does all of this at 60 frames-per-second, so your robot can be fast, too.
Use Pixy2 for lots of different applications, find a project, or use Pixy2 for something no one has considered!
Connect directly to Arduino or Raspberry Pi
No need to futz around with tiny wires — Pixy2 comes with a special cable to plug directly into an Arduino and a USB cable to plug into a Raspberry Pi, so you can get started quickly. No Arduino or Raspberry Pi? No problem! Pixy2 has several interfaces (SPI, I2C, UART, and USB) and simple communications, so you get your chosen controller talking to Pixy2 in short order.
Learn more / En savoir plus / Mehr erfahren: https://www.scoop.it/t/21st-century-learning-and-teaching/?&tag=ARDUINO
|
|
Scooped by
Gust MEES
|
Bitmaps & Code by Leslie Birch Time to create two image files and convert them into a code the OLED can understand.
Use Photoshop or another imaging program to create two cameo profile pics and turn them into bitmaps (.bmp). They should be monologue and 128x64 pixels. Notice I had my images each facing another direction.
Download LCD Image Converter and run.
Choose New Image and create a name. Then hit enter.
Now choose Image and Import. Select the file.
Now choose Options and Conversion, then Prepare. The followiing should be checked: Type: Monochrome, Threshold Dither, Main Scan Direction: Left to Right, Line Scan Direction: Forward
Now select Image. Make sure Select to Rows is checked. 8-Bit and Little Endian.
Hit OK, then File, Convert. Name the file. Now do the same process for your other file. The completed files will contain a series of code that you need to cut and paste into the project code to replace the files I provided. It will look something like this, only longer. Note that you don't need the beginning name, just the brackets and what is contained within them...
Learn more / En savoir plus / Mehr erfahren: https://www.scoop.it/t/21st-century-learning-and-teaching/?&tag=ARDUINO https://www.scoop.it/t/21st-century-learning-and-teaching/?&tag=OLED
|
|
Scooped by
Gust MEES
|
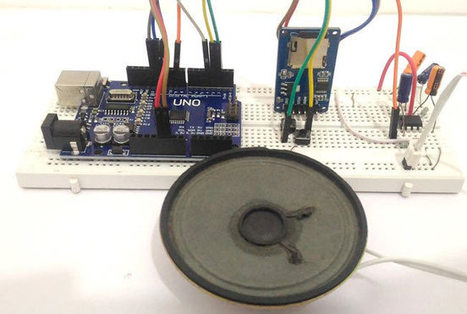
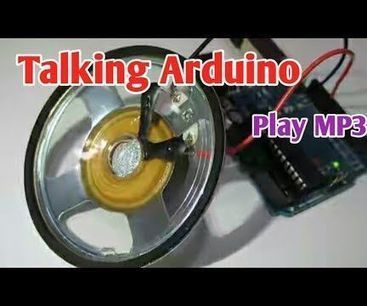
Adding sounds or music to our project will always make it looks cool and sounds much more attractive. Especially if you are using an Arduino and you have lots of pins free, you can easily add sound effects to your project by just investing in an extra SD card module and a normal speaker. In this article I will show you how easy it is to Play music/add sound effects using your Arduino Board. Thanks to the Arduino community who have developed some libraries to build this in a fast and easy way. We have also used IC LM386 here for amplification and noise reduction purpose. [Gust MEES] GREAT music quality!! Learn more / En savoir plus / Mehr erfahren: https://www.scoop.it/t/21st-century-learning-and-teaching/?&tag=ARDUINO https://www.scoop.it/t/21st-century-learning-and-teaching/?&tag=SDCard
|
|
Scooped by
Gust MEES
|
|
|
Scooped by
Gust MEES
|
|
|
Scooped by
Gust MEES
|
|
|
Scooped by
Gust MEES
|
|
|
Scooped by
Gust MEES
|
Wer mit Ultraschall-Levitation experimentieren und Objekte rein durch die Energie von Schallwellen schweben lassen möchte, benötigt dafür keine wissenschaftliche Gerätschaften, komplizierte Steuerungen oder teuren Bausätze. Ein Arduino, ein Stepper-Motor-Treiber und ein umgebauter Abstandssensor reichen aus.
Das fertige Micro Ultrasonic Levitation Device und einige der nötigen Zutaten (Bild: Ulrich Schmerold)
Zugegeben: Unser Mini Ultrasonic Levitation Device kann keine schweren Gegenstände in der Luft halten. Doch auch kleine Styroporkügelchen sind faszinierend, wenn sie wie von Geisterhand schweben. Anders als bei magnetischer Levitation benötigt man für die Ultraschallvariante keine Regelung, die das schwebende Objekt überwacht. Bei der akustischen Levitation "nistet" sich ein Objekt in einem Knoten einer stehenden akustischen Welle ein. Dadurch können auch mehrere Dinge gleichzeitig übereinander schweben – und nehmen sogar gleichmäßig verteilte Positionen ein. Learn more / En savoir plus / Mehr erfahren: https://www.scoop.it/t/21st-century-learning-and-teaching/?&tag=ARDUINO
|
|
Scooped by
Gust MEES
|
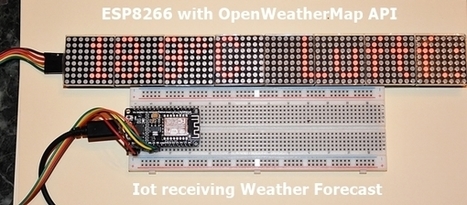
Scrolling Text with 8x8 LED MATRIX (4 Modules in One) . . . As we were playing around already with LED's in previous blog posts let us NOW try out a LED Matrix "4 in one"; its four (4) singular displays soldered on one piece of a single printed circuit board (PCB)... Learn more / En savoir plus / Mehr erfahren: https://www.scoop.it/t/21st-century-learning-and-teaching/?&tag=ARDUINO
|
|
Scooped by
Gust MEES
|
Arduino Projects
Arduino is a popular open-source development board for engineers and makers to develop electronics projects in an easy way. It consists of both a physical programmable development board (based on AVR series of microcontrollers) and a piece of software or IDE which runs on your computer and used to write and upload the code to the microcontroller board.
Explore below some interesting arduino projects and tutorials based on different types of arduino baords like Arduino Uno, Arduino Pro Mini, etc. These DIY arduino projects for beginners are explained well and you can find the complete guide to DIY these projects with the help of circuit diagrams, source codes and videos. You can also browse below pages to get new arduino project ideas.
Learn more / En savoir plus / Mehr erfahren: https://www.scoop.it/t/21st-century-learning-and-teaching/?&tag=ARDUINO
|
|
|
Scooped by
Gust MEES
|
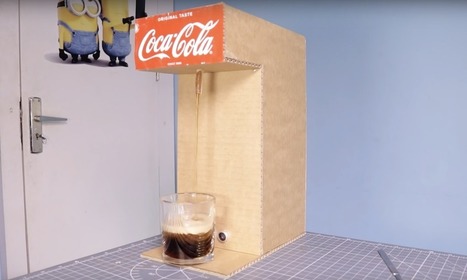
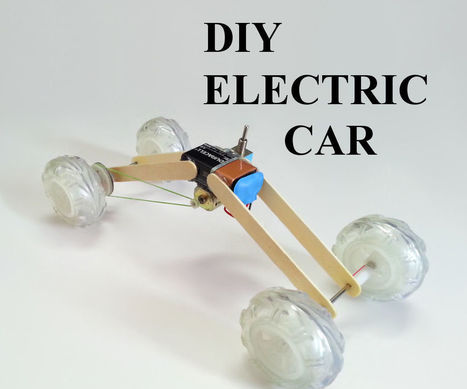
If you’re ever wanted to make something awesome, but thought that you just didn’t have the right tools to do so, this soda fountain by “The Wrench” could provide the needed inspiration.
The project uses an Arduino Nano to control a small air pump via a relay, which turns on when a glass is the correct dispensing position. This pushes air into a sealed soda bottle, and soda is pushed out of another tube to equalize the pressure.
Learn more / En savoir plus / Mehr erfahren: https://www.scoop.it/t/21st-century-learning-and-teaching/?&tag=ARDUINO
|
|
Scooped by
Gust MEES
|
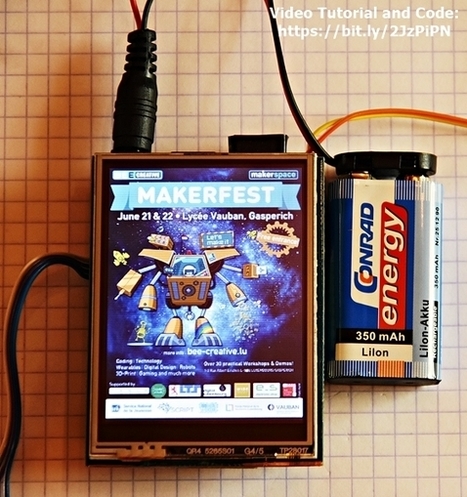
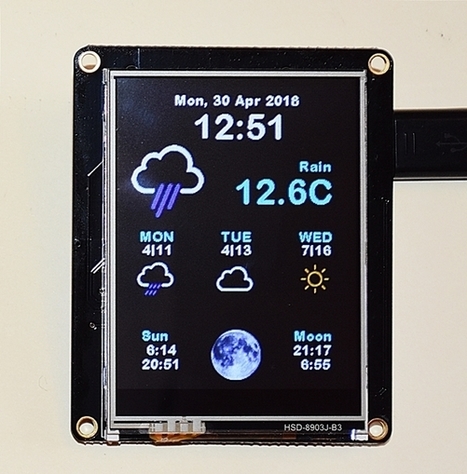
We were already playing around with a 2.8 inch TFT Display and SDCard recently in a previous tutorial <===> First Steps with the Arduino-UNO R3 | Maker, MakerED, Coding | 2.8″ TFT Touch Screen with SDCard <===> and we will create a badge. Learn more / En savoir plus / Mehr erfahren: https://www.scoop.it/t/21st-century-learning-and-teaching/?&tag=ARDUINO
|
|
Scooped by
Gust MEES
|
|
|
Scooped by
Gust MEES
|
Learning to Code
So, you like video games? Do you know that actual humans make video games with some type of computer code? It's true. But even better, kids can write programs too. It might seem scary to get started, but it's really not too bad. If you want to get started, I am going to recommend code.org. There are plenty of learning guides that are appropriate for a variety of ages. Oh, and it's free and online.
Even the lowest level activities are very complete—they even include ideas about functions and debugging. It's the best way to get a general idea of computer programming before moving on to a particular language.
If you want to be more creative with your programming, there is also Scratch (scratch.mit.edu). Scratch is a graphical (and free) programming language that focuses on the control of animated sprites. It's pretty easy to pick up and it's built so that you can share programs and modify others.
Finally, there is one more set of coding activities—physical programming. Physical programming takes some type of code but adds onto it some actual object that the code can control. If that sounds awesome, it's only because it is. There are two physical programming platforms that I have worked with before—Raspberry Pi and Arduino. Although these devices are not free, they aren't super expensive either. Both platforms have tons of great projects that kids (or adults) can work on.
Example: https://projects.raspberrypi.org/en/ and https://create.arduino.cc/projecthub Learn more / En savoir plus / Mehr erfahren: https://www.scoop.it/t/21st-century-learning-and-teaching/?&tag=ARDUINO
|
|
Scooped by
Gust MEES
|
We’re excited to announce the Arduino Engineering Kit, the first product released as a result of our new partnership with MathWorks, to reinforce the importance of Arduino at the university level in the fields of engineering, Internet of Things, and robotics.
The Arduino Engineering Kit, which will be available for purchase starting today on the Arduino online store, consists of three cutting-edge, Arduino-based projects and will teach students how to build modern electronic devices – challenging them intellectually and helping them develop physical engineering skills that will better prepare them to enter the commercial market following graduation. In addition to the hardware, after registering online, students and educators will have access to a dedicated e-learning platform and other learning materials. The kit also includes a one-year individual license for MATLAB and Simulink, providing the user with hands-on experience in system modeling and embedded algorithm development. Learn more / En savoir plus / Mehr erfahren: https://www.scoop.it/t/21st-century-learning-and-teaching/?&tag=ARDUINO
|
|
Scooped by
Gust MEES
|
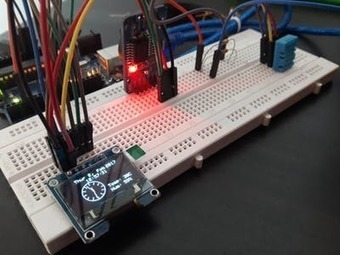
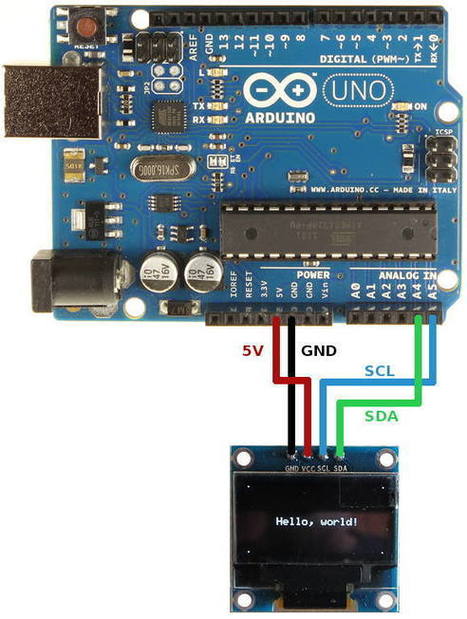
How to connect and program the Geekcreit 0.96 inch 4 pin white I2C OLED module with Arduino. OLED display based on a SSD1306 OLED driver IC.
In this tutorial a 0.96 inch monochrome OLED display from Geekcreit is connected or interfaced to an Arduino. Libraries are then installed and some example programs run which show how to use the display in an Arduino sketch.
The display connects to Arduino using only four wires – two for power and two for data, making the wiring very simple. The data connection is I2C (I²C, IIC or Inter-Integrated Circuit). This interface is sometimes called TWI (Two Wire Interface).
At the very lowest level, the Arduino Wire library is used to communicate with the display. Libraries are available that make it easy to start using the display right away to display text and graphics. These libraries are installed in this tutorial. [Gust MEES] It works with THIS OLED <===> https://www.amazon.de/dp/B01L9GC470 Learn more / En savoir plus / Mehr erfahren: https://www.scoop.it/t/21st-century-learning-and-teaching/?&tag=ARDUINO
|
|
Scooped by
Gust MEES
|
|
|
Scooped by
Gust MEES
|
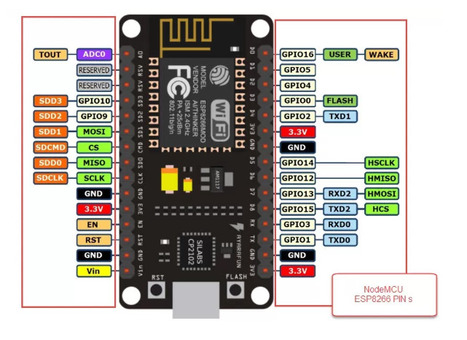
Der NodeMCU ESP8266 ist wohl derzeit das Lieblings-Controller-Board vieler Bastler. Denn es vereint viele Vorteile unter einem Dach. Hier ein kleiner Auszug, was zum Erfolg des NodeMCU ESP8266 geführt hat: - kompakt und klein
- WLAN on Board
- viel Speicherplatz
- USB-Schnittstelle (Bootloader)
- lässt sich über Arduino IDE programmieren
- große Anzahl an Schnittstellen
Tja, und um genau diese Schnittstellen geht es hier in diesem Beitrag.
Hier zeigen wir Euch z.B. wo welche GPIO Ports liegen, wo ihr den Ground findet, an welcher Stelle das Board 3,3 Volt liefert. Welche PIN Stecker für RX und TX verwendet werden können – einfach alles, was man so über die PINs des NodeMCU ESP8266 wissen muss.
Learn more / En savoir plus / Mehr erfahren: https://www.scoop.it/t/21st-century-learning-and-teaching/?&tag=ARDUINO https://www.scoop.it/t/21st-century-learning-and-teaching/?&tag=ESP8266+WiFi+Module
|
|
Scooped by
Gust MEES
|
|
|
Scooped by
Gust MEES
|
|
|
Scooped by
Gust MEES
|
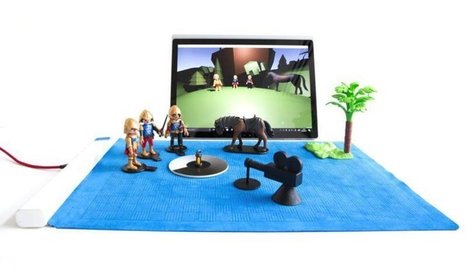
Microsoft has unveiled its latest research project today, Project Zanzibar. It’s a smart mat that’s designed to blend the digital and physical worlds by sensing touch, gestures, and objects. A team of researchers, with a love of toys, created the project at Microsoft’s research labs in the UK. The mat folds and combines sensing, near field communication (NFC), and multi-touch to imagine a future where you could place objects on this smart mat and play games.
Microsoft’s video (above) demonstrates a number of different games that track the position, movement, and orientation of objects — all thanks to NFC stickers. The smart mat, that reminds me of the Surface Music Cover, can even detect inputs like button presses, and works with existing devices via Bluetooth. While the software maker demonstrates basic games for learning, programming, and augmented reality, this looks like the perfect hardware to combine the company’s Minecraft game with real-world Lego blocks. Objects can be easily tagged with NFC stickers, so you could stack them and have the mat translate that physical object into Minecraft. Learn more / En savoir plus / Mehr erfahren: https://www.scoop.it/t/21st-century-learning-and-teaching/?&tag=makered
|
|
Scooped by
Gust MEES
|
|


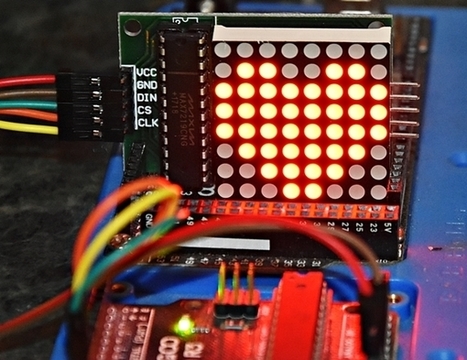


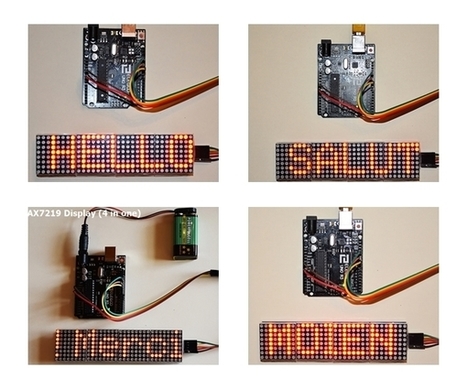


Valentine's Day is around: GET creative with an LED Matrix and an Arduino! [Start Text Wikipedia] Valentine's Day, also called Saint Valentine's Day or the Feast of Saint Valentine,[2] is celebrated annually on February 14. Originating as a Western Christian feast day honoring one or two early saints named Valentinus, Valentine's Day is recognized as a significant cultural, religious,…
Learn more / En savoir plus / Mehr erfahren:
https://www.scoop.it/t/21st-century-learning-and-teaching/?&tag=ARDUINO
https://www.scoop.it/topic/21st-century-learning-and-teaching/?&tag=Gust-MEES
https://www.scoop.it/topic/21st-century-learning-and-teaching/?&tag=LED+Matrix