Aside from cool cat feeders, it is possible to find multiple maker projects for controlling garage doors, blind windows, smart locks, tracking cars, control temperature and humidity levels, and so on. However, the security aspect of these devices needs to take some extra attention, starting from the connection between the device and the Cloud infrastructure.
Most microcontrollers today are not powerful enough to handle secure connections, like SSL or TLS, so all the communication between the device and the server is open to attacks, like sniffing values, tacking device credentials, faking values, granting unauthorized access to physical facilities, unlocking doors, and many other possibilities. This way, securing the communications for all the Internet-connected devices should be a priority, especially if they can jeopardize our security or privacy.
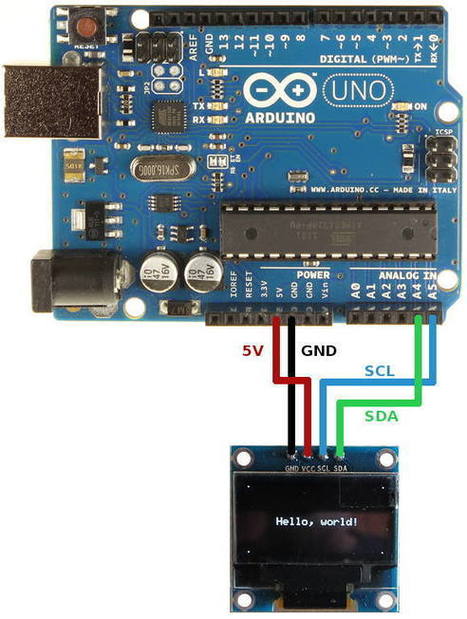
The security of the Internet of Things does not only rely on secure communications, but it is a great start. The maker community must be aware of the security concerns of untrusted communications, and must have the appropriate resources to handle it. This way it is common to see different alternatives to offer secure communications in the microcontrollers, like porting SSL/TLS libraries to cheap devices like ESP8266, or device vendors that already integrates a crypto chip that process all this stuff by hardware, like the recent Arduino MKR1000.
In thinger.io we are concerned about this security aspect, so our cloud supports secure connections for any device with this capability. In the recent Arduino library update, starting from version 2.4.1, we have introduced support for the Arduino MKR1000, including secure TLS connections by default. Just start with the following sample sketch for the MKR1000, and you will have encrypted connections by default.
Learn more / En savoir plus / Mehr erfahren:
https://www.scoop.it/t/21st-century-learning-and-teaching/?&tag=ARDUINO
https://www.scoop.it/t/21st-century-learning-and-teaching/?&tag=IoT


 Your new post is loading...


While the new web-based build system was vital in keeping Arduino up to date with the way makers and educators use hardware, the announcement of an official command line interface is vital for professional developers.
Learn more / En savoir plus / Mehr erfahren:
https://www.scoop.it/t/21st-century-learning-and-teaching/?&tag=ARDUINO